There are situations when you found your Internet connectivity very poor and slow resulting into increased web page loading time or in worst case almost dead Internet which can be quite embarrassing and it has been observed that most of the times such issues arises due to DNS server problems. What actually DNS does is that it converts the web address that you type in your address bar to IP addresses so that you can easily go to your website url without the need of IP address and any misconfiguration with your DNS settings may lead to Internet issues or poor Internet experience. So to avoid Internet issues due to DNS server it is best to use Google DNS or Open DNS wherever you are accessing Internet as these are the best and reliable DNS server addresses used by millions of users. Though you can easily set your default DNS to Google DNS or Open DNS in your computer or laptop but there is no such direct option in Google Android OS so for this you need to do a simple workaround which I have mentioned below. Therefore just check the below instructions on how to change dns in android.
How to Change DNS in Android via Set DNS App : Steps to Follow
One thing great about having an android Smartphone is the availability of millions of apps spread across different fields that simplifies most of your work related to your android device like configuring or tweaking phone settings etc and here also with the help of Popular Set DNS Application we are going to change the DNS Settings in android device. SetDNS is the easiest way to force your rooted phone to use custom nameservers on WiFi for all devices AND 3G/mobile networks on rooted devices. Works for both IPv4 and IPv6 networks and nameservers. So just follow the below given instructions.
- First of all you need to download and Install Set DNS App on your Android device – Click to Install Set DNS
- Now after complete installation run Set DNS app from your device and while running for the first time make sure to allow the Superuser Permission.

- Here in the app tap on the drop-down menu from the top after which you will be shown with different DNS options to choose from as shown below.
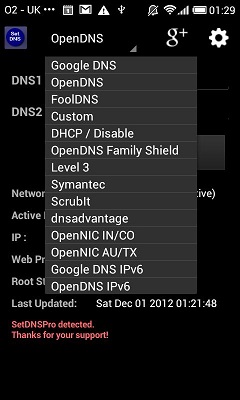
- Therefore just select Google DNS or Open DNS or whatever you want to choose as per your convenience.
Note :
If you are accessing Internet via WiFi or Using 3G enabled Internet connectivity then you need to enable options ‘Override Wifi DNS’ and ‘Override 3G DNS’ from SetDNS Settings.

Related Searches :
- How to Set Google DNS in Android
- How to change default DNS in Android
- How to set Open DNS Android


